Creación de Documentos en HireHop – Documentos como PDF e impresión

Hire Software quote proposal

HireHop tiene un motor de documentos muy potente, que le permite crear documentos de aspecto profesional y sorprendente; sin embargo, aunque es potente, es muy fácil de usar.

Los documentos son todos HTML estándar y son totalmente compatibles con CSS y JavaScript, incluso cuando HireHop los convierte a PDF.

Hay numerosas plantillas estándar disponibles, y cada plantilla se puede personalizar si es un suscriptor de pago de HireHop.

Tipos de documentos

Un documento solo estará disponible en ciertos lugares apropiados en el software y, en determinadas circunstancias, por ejemplo, un documento de oferta de trabajo solo aparecerá cuando esté en un trabajo, y no cuando esté en Gestión de existencias o un Proyecto. Otro ejemplo es que un documento de factura de trabajo solo aparecerá cuando se seleccione una factura autorizada en la pestaña Facturación, por lo que si la factura no está autorizada, el documento de factura no aparecerá.

Plantillas de documentos

En Configuración->Documentos, puede agregar un nuevo documento de plantilla o editar documentos existentes. Todos los documentos de plantilla tienen un icono de candado en la fila de la cuadrícula, pero si edita uno, crea una copia como documento nuevo. Los documentos de plantilla (los que tienen íconos de candado) están bien para eliminar, ya que siempre puede volver a agregarlos fácilmente. Los documentos sin el ícono de candado son documentos personalizados y no se pueden recuperar una vez que los elimine, por lo que se recomienda mantener copias de seguridad.

Edición de un documento

HireHop tiene un editor HTML incorporado, sin embargo, esto es muy básico y se recomienda usar la vista «Fuente» tanto como sea posible.

Los documentos de HireHop tienen campos de combinación que HireHop rellena previamente con los datos apropiados cuando imprime, descarga o envía un documento por correo electrónico. La lista de campos y la explicación sobre cómo usarlos se pueden encontrar en https://myhirehop.com/modules/docmaker/fields.php.

Interfaz con la API

En lugar de usar campos de combinación, los documentos en HireHop también pueden comunicarse con la API de HireHop y extraer datos sin procesar directamente del software. Tenga en cuenta que esto no funcionará para documentos de enlace compartido por razones de seguridad. Los documentos de HireHop también pueden comunicarse con API de terceros e incluso cargar y usar marcos de JavaScript.

Como ejemplo de un documento que obtiene sus datos mediante la API, copie el código del documento en https://myhirehop.com/docs/job_info.html y péguelo en un documento de trabajo. La salida no es muy interesante, es solo un volcado de datos recibidos del servidor usando la API.

También puede publicar (enviar) datos en un documento, que es lo que hace el documento de solicitud de firma. Otro ejemplo es el siguiente código, por lo que cuando imprima o envíe por correo electrónico un documento de cotización, al agregar el código a continuación en el documento de cotización, se creará automáticamente un archivo cada vez que el documento se abra en una nueva pestaña, se descargue como PDF o se envíe por correo electrónico. como PDF.

<script>
	// Guarde la lista de suministro como una cotización una vez que el documento haya terminado de cargarse
	window.onload = function() {
		var http = new XMLHttpRequest(),
		    job_id = document.getElementById("number").textContent,
		    now_str = (new Date()).toLocaleDateString(),
		    params = "job=" + job_id + "&desc=" + encodeURIComponent("Cotización enviada - " + now_str);
		http.open("POST", "/php_functions/archive_insert.php");
		http.setRequestHeader("Content-type", "application/x-www-form-urlencoded");
		http.send(params);
	}
</script>

Documentos como PDF

HireHop utiliza dos motores para representar documentos en formato PDF: Chromium, que utilizan Google Chrome y Microsoft Edge, o WebKit, que es la base del navegador Safari de Apple. WebKit es mucho más antiguo y ya no se mantiene, y no es compatible con HTML5 tan bien como lo hace Chromium, sin embargo, es mucho más rápido al crear documentos PDF debido a su simplicidad, por lo que si se ve bien con Webkit, se recomienda hacerlo.

Documento de papelería

Al imprimir o enviar por correo electrónico documentos PDF con HireHop, puede agregar material de escritorio sobre el que se superpondrá el documento. La papelería se carga como archivos PDF en Gestión de depósitos y, por lo tanto, es diferente para cada depósito (incluidos los depósitos virtuales).

Las páginas de papelería se agregan a cada página correspondiente de un documento y la última página de papelería se repite para todas las páginas restantes del documento. Como ejemplo, con un documento de papelería de una página, se colocará detrás de cada página del documento. Si el diseño de fondo es un PDF de dos páginas, la primera página del diseño de fondo aparecerá detrás de la página uno del documento, y la segunda página detrás de la página dos, y todas las demás páginas posteriores del documento. La papelería puede tener tantas páginas como quieras.

 

Cómo funcionan los webhooks en HireHop

HireHop puede enviar un mensaje con datos a otras aplicaciones cuando se activan ciertos eventos dentro de HireHop . Este mensaje se denomina webhook que envía automáticamente los datos relevantes a la ubicación requerida.

Webhooks¿Qué es un webhook?

Un webhook envía/empuja un mensaje, con datos adjuntos al mensaje, cuando suceden cosas específicas en HireHop (un evento). Los webhooks se envían a través de HTTP (llaman a una dirección web) y son una forma de enviar datos a otras aplicaciones en tiempo real. Los webhooks entregan los datos relevantes a aplicaciones específicas a medida que ocurren, lo que significa que la aplicación receptora obtiene los datos inmediatamente después de que ocurre el evento, lo que es mucho más eficiente y rápido que buscar cambios en los datos.

Los webhooks de HireHop se pueden usar para comunicarse directamente con otras aplicaciones o se pueden enviar a un conector como Zapier, que se puede hacer para formatear los datos y realizar las llamadas API necesarias a HireHop o a otra aplicación.

Configuración de un webhook

En HireHop, vaya a «Configuración», luego haga clic en la pestaña «Configuración de la empresa» y en el botón «Webhooks» en la parte superior de la página. En la ventana emergente, haga clic en el botón «Nuevo» y agregue la URL a la que se enviará el mensaje del webhook y seleccione todos los webhooks a los que desea que responda la URL. Puede agregar tantos webhooks como desee, pero debe limitarlos solo a los necesarios a los que responderá la URL específica.

Un webhook de HireHop publicará datos en su punto final de URL como JSON y contendrá los siguientes datos o datos similares.

{
    "time": "2022-03-29 07:50:42",
    "user_id": 1,
    "user_name": "John Smith",
    "user_email": "john@email.com",
    "company_id": 1,
    "export_key": "22u43mrjwe7u",
    "event": "invoice.status.updated",
    "data": { ... },
    "changes": {
        "FIELD_NAME": {
            "from": "antiguo",
            "to": "nuevo"
        }, ...
    }
}

En el ejemplo JSON anterior, los siguientes campos son:

  • «time» es la hora UTC y la fecha en que se envió el webhook.
  • «user_id» es el ID del usuario que provocó que se desencadenara el evento.
  • «user_name» es el nombre de su usuario.
  • «company_id» es el identificador de número único de la empresa para la que trabaja el usuario.
  • «export_key» es el valor de la clave de exportación en la configuración de la empresa que se puede utilizar como control de seguridad.
  • «event» es el nombre del evento de webhook que se activó.
  • «data» son los datos que pertenecen al evento webhook.
  • «changes» son los campos que cambiaron, siendo lo que eran a lo que cambiaron.

HireHop no esperará una respuesta de la URL llamada ni informará un error HTTP al llamarlo.

Ejemplo de código PHP para un punto final de URL para capturar los datos del webhook sería:

<?php
	// Leer los datos JSON
	$postdata = file_get_contents('php://input');
	// Convertir datos JSON en un objeto
	$data_str = json_decode($postdata);
?>


Posted in API

HireHop Rest API – Guía de Introducción

HireHop está construido sobre una API, lo que significa que cualquier cosa que vea que HireHop haga, también puede lograrlo utilizando la extensa API. Todo lo que necesita para acceder a la API Rest es un token de usuario aplicado como GET o POST al punto final de la URL relevante.

Tokens de API

Para generar un token de API, vaya a la página «Configuración» y seleccione la pestaña «Usuarios». Seleccione o cree un usuario, luego, mientras ese usuario específico está seleccionado, haga clic en el botón «Menú» y luego en la opción «Token API» para generar un token. A continuación, se mostrará el token y se podrá copiar al portapapeles con el botón Copiar.

El token dejará de ser válido si cambia el correo electrónico o la contraseña del usuario seleccionado, o si posteriormente inicia sesión con ese usuario. Para evitar que esto suceda, debe crear un usuario de API dedicado y, por seguridad, otorgarle los permisos pertinentes, restringiéndolo de cualquier cosa para lo que no utilizará la API.

Por razones de seguridad, no debe usar el token en el código JavaScript de front-end, solo debe usarse del lado del servidor, ya que si un pirata informático obtiene el token, puede cambiar y acceder a sus datos en HireHop, así que mantenga su token en secreto. Si su token se filtra, simplemente cambie la contraseña del usuario de la API y genere un nuevo token.

Usando un Token

Un token debe establecerse como un parámetro GET o POST que se llama «token». Por ejemplo, para cargar datos de trabajo para el trabajo número 52, HireHop llamará al punto final de la API:

https://myhirehop.com/php_functions/job_refresh.php?job=52

Si desea llamar al mismo punto final usando un token, la URL sería:

https://myhirehop.com/php_functions/job_refresh.php?job=52&token=dqwejk5GVT65909bHHBN7922pq5hxjm%207hmn

Recuerde que al pasar el token a través de GET (un parámetro de URL como el anterior), primero debe codificar el token con una herramienta como https://meyerweb.com/eric/tools/dencoder.

Publicación de Datos

Para crear o editar datos en HireHop debes usar un POST. Al publicar datos, debe configurar solo los campos que desea cambiar, por ejemplo, para crear o editar un trabajo usando el punto final https://myhirehop.com/php_functions/job_save.php, estableciendo el parámetro «trabajo» en «0 «u omitirlo creará un nuevo trabajo, cualquier otra cosa editará el número de trabajo relevante. Entonces, para editar el nombre de la empresa en el trabajo número 52, los datos de la publicación deben ser:

{
"job" : 52,
"name" : "New Name",
"token" : "dqwejk5GVT65909bHHBN7922pq5hxjm=-7hmn"
}

Puntos finales de la API

Muchos puntos finales de la API están documentados en la documentación de la API, y seguirán muchos más.  Para establecer el punto final de una tarea, en la aplicación HireHop, use la consola del navegador para inspeccionar las llamadas de red y los parámetros establecidos. Pronto se publicará una guía completa de los puntos finales de URL.

Límites de tasa

HireHop permite a cada usuario 60 solicitudes de conexión en un período de 1 minuto. Si hay más de 60, se devuelve un error de «Advertencia de seguridad, demasiadas transacciones» (327).

Posted in API

Fuentes de Dominio Cruzado CORS – La Fuente CSS No Se Carga

Muchos usuarios han creado algunos documentos sorprendentes para usar en HireHop, utilizando la funcionalidad HTML5, JavaScript y CSS. Para estos documentos, los usuarios a veces necesitan una fuente especial que almacenan en su servidor, sin embargo, a veces la fuente no parece funcionar en el documento HireHop. La razón de esto se debe a las restricciones de uso compartido de recursos entre orígenes (CORS) en los navegadores.

Las Fuentes no se Cargan en Documentos y Páginas

La mayoría de los navegadores web no permiten solicitudes entre dominios, esto se debe a la misma política de seguridad de origen. Esto significa que, a veces, el uso de fuentes web de otro dominio puede provocar errores y la fuente no se carga en el navegador o en los documentos de HireHop.

<style type="text/css">
@font-face {
    font-family: 'OpenSans';
    src: url('https://my_server.com/fonts/OpenSans.woff2') format('woff2');
}
html, body{
    font: normal 16px OpenSans, sans-serif;
}
</style>

La Solución

Para corregir las restricciones de origen cruzado para sus fuentes, la respuesta del servidor remoto que aloja los archivos de fuentes debe incluir el encabezado Access-Control-Allow-Origin.

Si está utilizando servicios de fuentes como Typekit o Google Fonts, o tal vez redes de entrega de contenido como BootstrapCDN, CdnJS o JsDelivr para cargar sus fuentes preferidas, no necesita hacer nada, porque el encabezado Access-Control-Allow-Origin es ya enviado en su encabezado de respuesta.

Apache

Para configurar un servidor web Apache, introduzca el siguiente código en el archivo httpd.conf o .htaccess.

  1. Agregue los encabezados de tipo mime en Apache:
    AddType application/vnd.ms-fontobject    .eot
    AddType application/x-font-opentype      .otf
    AddType image/svg+xml                    .svg
    AddType application/x-font-ttf           .ttf
    AddType application/font-woff            .woff
    AddType application/font-woff2           .woff2
    
  2. Habilite el uso compartido de recursos de origen cruzado (CORS) en Apache para los tipos de mime:
    <IfModule mod_headers.c>
      <FilesMatch ".(eot|otf|svg|ttf|woff2?)$">
        Header set Access-Control-Allow-Origin "*"
      </FilesMatch>
    </IfModule>
    

NGINX

Para configurar un servidor web NGINX, coloque el siguiente código en /etc/nginx/nginx.conf o su archivo personalizado /etc/nginx/conf.d/custom.conf.

  1. Agregue los encabezados de tipo mime en NGINX:
    application/vnd.ms-fontobject    eot;
    application/x-font-opentype      otf;
    image/svg+xml                    svg;
    application/x-font-ttf           ttf;
    application/font-woff            woff;
    application/font-woff2           woff2;
    
  2. Habilite el uso compartido de recursos de origen cruzado (CORS) en NGINX para los tipos de mime:
    location ~* .(eot|otf|svg|ttf|woff|woff2)$ {
        add_header Access-Control-Allow-Origin *;
    }
    

IIS

Para configurar Microsoft IIS, agregue el siguiente código al archivo web.config system.webServer.

  • Habilitar el uso compartido de recursos de origen cruzado (CORS) en IIS
    <system.webServer>
      <httpProtocol>
        <customHeaders>
          <add name="access-control-allow-origin" value="*" />
          <add name="access-control-allow-headers" value="content-type" />
        </customHeaders>
      </httpProtocol>
    </system.webServer>
    

PHP

Si no puede cambiar la configuración del servidor, siempre puede usar PHP para entregar el archivo de fuente.

  • Utilice un archivo de secuencia de comandos del servidor en lugar de un archivo de fuente físico
    <style type="text/css">
    @font-face {
        font-family: 'OpenSans';
        src: url('https://my_server.com/fonts/OpenSans.php') format('woff2');
    }
    html, body{
        font: normal 16px OpenSans, sans-serif;
    }
    </style>
    
  • Cómo solucionar problemas entre dominios @ font-face con PHP
    <?php
    // fonts.php
    header('Access-Control-Allow-Origin: *');
    header('Content-Type: application/font-woff2');
    echo @file_get_contents('/fonts/OpenSans.woff2');
    ?>
    
Posted in API

How To Setup HireHop With QuickBooks – HireHop Equipment Rental Software + QuickBooks

QuickBooks Equipment Rental SoftwareHow Do HireHop and QuickBooks Integrate?

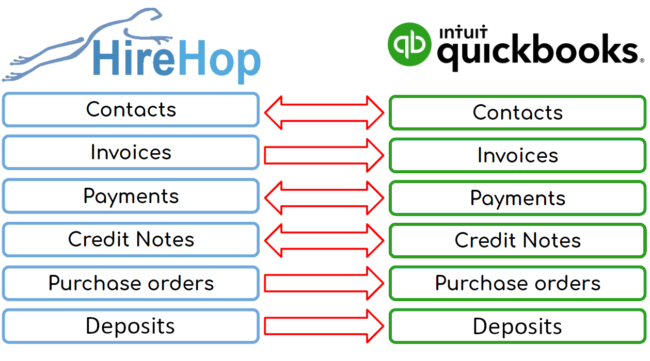
HireHop can produce your invoices, credit notes, payments and purchase orders.  HireHop also has an address book that contains customers and suppliers, as well as jobs where the customer is unique and not in the address book.  HireHop also keeps track of what has been paid and credited against invoices, as well as the balance of a customer’s account.

QuickBooks needs these invoices, credit notes, payments, purchases orders and contacts created in HireHop for bookkeeping purposes. With our integration working seamlessly behind the scenes, HireHop tells QuickBooks when they are created or updated so you don’t have to. In turn, HireHop needs to know what payments or credits have been applied in QuickBooks so that it can register invoices as being paid or not.

What Data Does HireHop Send To QuickBooks?

There are two modes to synchronise data between HireHop and QuickBooks – being live or buffered:

  • In live mode, as soon as you create or edit an invoice, credit note, payment, or purchase order, it is immediately sent to QuickBooks.
  • In buffered mode they are all kept in a buffer until such time you which to synchronise data between HireHop and QuickBooks.  Any invoice, credit note, purchase order or payment that fails to sync with QuickBooks in Live Mode will automatically be put into the buffer for a manual sync.  All buffered invoices and credits can be viewed in the Invoices to be Exported report.

HireHop invoices are sent to QuickBooks once the status has been changed to Approved or above.  If an Approved invoice is edited, it is re-sent to be updated in QuickBooks.  The same goes for Purchase Orders, Credit Notes and Payments.

All new contacts used in invoices and purchase orders are automatically sent to QuickBooks from HireHop.

In QuickBooks, an entry in the address book can’t be both a customer and supplier, therefore, as this feature is available in HireHop, when this happens, HireHop will create two entries in the QuickBooks address book, one for the customer address book, and one for the supplier address book.

Once you have synchronised or connected HireHop to QuickBooks, QuickBooks will authorise this connection for 3 months, after which time HireHop will prompt you to reconnect the next time a connection is needed.

What Data Does QuickBooks Send To HireHop?

Contacts are imported from QuickBooks into HireHop in Settings, enabling you to import only the contacts that you need so that your address book doesn’t become cluttered.

When a payment or credit note is applied to an invoice within QuickBooks, they are sent over to HireHop and registered to the corresponding invoice. The invoice status is then automatically marked as having been paid or not.


How To Setup QuickBooks With HireHop

Setup HireHop with QuickBooks
  • In HireHop Settings click the Accounts tab.
  • In the Accounts click the New button on the right of the Accounting Packages table at the bottom of the screen, and a new accounts package window will open.
  • Click the first option that is titled «Integrate with«, and select «QuickBooks«. You can then set prefixes and start numbers for invoices, credit notes and purchase orders. You can also choose to buffer transactions and sync them when you decide, instead of having live and automated updates. Click the Next button to move on.
  • The «Accounts» page enables you to enter nominal codes and banks accounts.  Click the Synchronise button and HireHop will import all bank accounts and nominal codes from your QuickBooks account.  You should delete all the ones you won’t use in HireHop (you can add them back later). There will be one bank account and two nominal codes in bold, these are your defaults that can be changed.  The defaults are the ones selected when you don’t assign a nominal to an item. Once finished, click Next.
  • The next page is your «Tax codes», again click the Synchronise button and HireHop will import them from QuickBooks.  Again you can edit and change the defaults from the automatically set ones. Once finished, click Next.
  • Lastly is the «Contacts» page. You don’t have to import these, but if you do, you can match ones that are already in HireHop,  import others and delete the ones you won’t use.  Once finished click the Save button.

You will now see QuickBooks in the Accounting Packages table and some red flashing «Assign» buttons.  As HireHop can support multiple accounting packages in the same installation, different ones for individual depots or groups of depots, you have to set which depots use this version of QuickBooks.  Also HireHop has tax and nominal groups, again, these need to be assigned to QuickBooks ones.

  • Click the Assign button next to the «Accounting packages» table, click on the depot and select «QuickBooks» and then click the Save button.  If a depot is not set, it will use the default accounting package, if a virtual depot is not set, it will use the parent depot’s accounting package.
  • Click the Assign button next to the «Nominal groups» table, click on the QuickBooks row and each column to assign a nominal code to a nominal group. Once finished, click the Save button.  Any nominal group not set will resort to the default revenue or expense nominal code.
  • Lastly, click the Assign button next to the «Tax groups» table, click on the depot rows assigned to QuickBooks and click in each column to assign the appropriate Tax codes to the depot, and then click the Save button.

You have now setup QuickBooks and we are ready to go.


Find out more and try QuickBooks Accounting Software for free.

How To Setup HireHop With Xero – HireHop Equipment Rental Software + Xero Accounting

Xero Equipment Rental SoftwareHow Do HireHop and Xero Integrate?

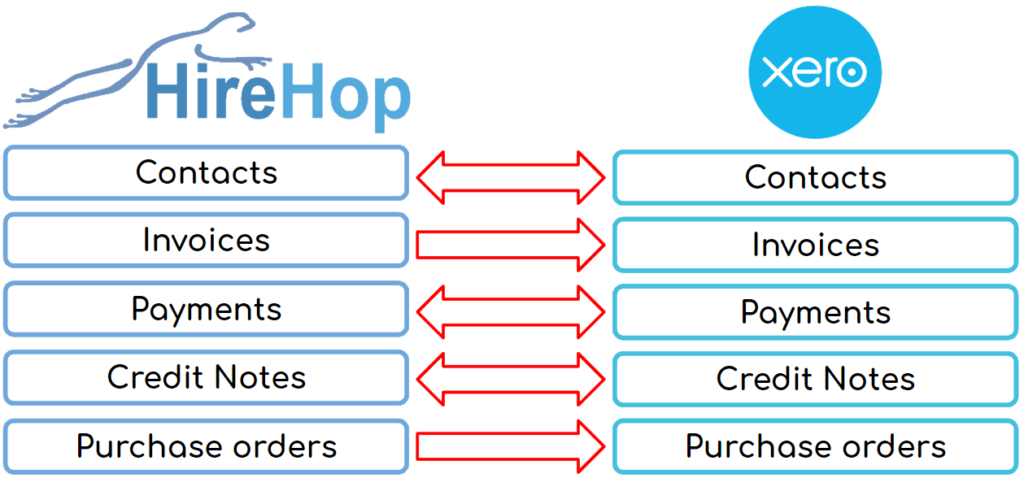
HireHop can produce your invoices, credit notes, payments and purchase orders.  HireHop also has an address book that contains customers and suppliers, as well as jobs where the customer is unique and not in the address book.  HireHop also keeps track of what has been paid and credited against invoices, as well as the balance of a customer’s account.

Xero accounting software needs these invoices, credit notes, payments, purchases orders and contacts created in HireHop for bookkeeping purposes. With our integration working seamlessly behind the scenes, HireHop tells Xero when they are created or updated so you don’t have to. In turn, HireHop needs to know what payments or credits have been applied in Xero so that it can register invoices as being paid or not.

What Data Does HireHop Send To Xero?

There are two modes to synchronise data between HireHop and Xero – being live or buffered:

  • In live mode, as soon as you create or edit an invoice, credit note, payment, or purchase order, it is immediately sent to Xero.
  • In buffered mode they are all kept in a buffer until such time you which to synchronise data between HireHop and Xero.  Any invoice, credit note, purchase order or payment that fails to sync with Xero in Live Mode will automatically be put into the buffer for a manual sync.

HireHop invoices are sent to Xero once the status has been changed to Approved or above.  If an Approved invoice is edited, it is re-sent to be updated in Xero.  The same goes for Purchase Orders, Credit Notes and Payments.

All new contacts used in invoices and purchase orders are automatically sent to Xero from HireHop.

What Data Does Xero Send To HireHop?

Contacts are imported from Xero into HireHop in Settings, enabling you to import only the contacts that you need so that your address book doesn’t become cluttered.

When a payment or credit note is applied to an invoice within Xero, they are sent over to HireHop and registered to the corresponding invoice. The invoice status is then automatically marked as having been paid or not.


How To Setup Xero With HireHop

Setup HireHop with Xero

  • In HireHop Settings click the Accounts tab.
  • In the Accounts click the New button on the right of the Accounting Packages table at the bottom of the screen, and a new accounts package window will open.
  • Click the first option that is titled «Integrate with«, and select «Xero«. You can then set prefixes and start numbers for invoices, credit notes and purchase orders. You can also choose to buffer transactions and sync them when you decide, instead of having live and automated updates. Click the Next button to move on.
  • The «Accounts» page enables you to enter nominal codes and banks accounts.  Click the Synchronise button and HireHop will import all bank accounts and nominal codes from your Xero account.  You should delete all the ones you won’t use in HireHop (you can add them back later). There will be one bank account and two nominal codes in bold, these are your defaults that can be changed.  The defaults are the ones selected when you don’t assign a nominal to an item. Once finished, click Next.
  • The next page is your «VAT codes», again click the Synchronise button and HireHop will import them from Xero.  Again you can edit and change the defaults from the automatically set ones. Once finished, click Next.
  • Lastly is the «Contacts» page. You don’t have to import these, but if you do, you can match ones that are already in HireHop,  import others and delete the ones you won’t use.  Once finished click the Save button.

You will now see Xero in the Accounting Packages table and some red flashing «Assign» buttons.  As HireHop can support multiple accounting packages in the same installation, different ones for individual depots or groups of depots, you have to set which depots use this version of Xero.  Also HireHop has tax and nominal groups, again, these need to be assigned to Xero ones.

  • Click the Assign button next to the «Accounting packages» table, click on the depot and select «Xero» and then click the Save button.  If a depot is not set, it will use the default accounting package, if a virtual depot is not set, it will use the parent depot’s accounting package.
  • Click the Assign button next to the «Nominal groups» table, click on the Xero row and each column to assign a nominal code to a nominal group. Once finished, click the Save button.  Any nominal group not set will resort to the default revenue or expense nominal code.
  • Lastly, click the Assign button next to the «VAT groups» table, click on the depot rows assigned to Xero and click in each column to assign the appropriate VAT codes to the depot, and then click the Save button.

You have now setup Xero and we are ready to go.


Find out more and try Xero Accounting Software for free.

Customisation & Customising Widgets – HireHop API NoHTML Framework

HireHop is completely customisable, you can even add custom fields, all done using the HireHop JavaScript injection method, in which JavaScript files that you have written are inserted into HireHop pages.  If you look at the page source of a HireHop page, you will see <!– PLUGINS –>, it is after here where the JavaScript for your plugins will be inserted.

HireHop has been built from the ground up, developing our own framework that we call NoHTML, amalgamating existing technology and methodology to produce a framework that is easy to use, extendable and enables fast page loading, even on slow internet connections.

Apart from the main part of the page, the main parts of HireHop are dynamically built on the client machine using JavaScript and jQuery widgets, similar to REACT and JSX, but more simple and of course using the familiar jQuery framework.  For instance, if you load a Job page and inspect the page (press F12 for the browser’s object inspector), you will see a <div> element at the bottom of the page structured like so:

<div id=»notes_tab«></div>

As you can see the above <div> is just an empty div element. If you click on the «Notes» tab, suddenly the above element is populated with elements.  Looking at your browser’s inspector you will also notice that the only data loaded from the server was some JSON and not the code in the notes tab.  The notes tab was built dynamically on the client machine using a custom jQuery UI Widget called $.notes() (internally called $.custom.notes) that is defined in the file /js/notes.js, and that widget used an ajax call to the server to get the data to populate it.

All the widget files on HireHop are compressed for speed, however to see the expanded source just add a .MAX to the end of the file’s name, for instance /js/notes.MAX.js.

To inject JavaScript into your webpages, if you go to Settings->Company Settings, and in Plugins add the url of your JavaScript file, which should be on an https server.  You can add multiple URLs which you can separate with a «;» (semi-colon).  All URLs must be to a secure https domain.

Extending A Widget

As these are jQuery UI Widgets, you can use a type of Object Orientated programming technique to overwrite parts of the HireHop widgets. For example, we are going to create a small plugin that adds a span element with the word Hello after the Refresh button on the notes widget.

First create a JavaScript file on your web server and add the following code

$(document).ready(function(){
// Check if the notes widget exists
if(typeof($.custom.notes)!=»undefined» && hh_api_version<=1) {
// Redefine notes widget
$.widget(«custom.notes«, $.custom.notes, {
_init_main: function() {
// Call the old _init_main
this._super(arguments);
// Add an hello after the refresh button
$(«<span>«,{ html:» Hello» }).insertAfter(this.btnRefresh);
},
// Even add your own new functions into the widget if you want

new_function_name: function() { }
});
}
});

The above code is available in a file located at https://s.myhirehop.com/plugins/demo.js.

Explaining the code above line by line:

$(document).ready(function(){
First we wait for the document to be ready and all page elements and JavaScript files to be loaded.  In this case this is not necessary as the /js/notes.js file is loaded before the plugin script, however for this example we have left it in for reference.

if(typeof($.custom.notes)!=»undefined» && hh_api_version<=1) {
Next we test to see if the notes widget has been defined, if it has we will proceed to overwrite one part of it.  Here we are also testing the HireHop API version the user is using.  As new versions of HireHop are released, the user will have the option to use it and this makes sure that your plugin is compatible with that version.

$.widget(«custom.notes«, $.custom.notes, {
Here we are initiating merging of a new JavaScript object containing functions into the notes widget.

_init_main: function() {
By naming a function the same as an existing one, it will be overwritten.

this._super(arguments);
This calls the inherited function, being the function we are overwriting.

$(«<span>»,{ html:» Hello» }).insertAfter(this.btnRefresh);
We then add a simple span element containing the word «Hello» after the Refresh button. you could also use $(«<span> Hello</span>»).insertAfter(this.btnRefresh);. To address elements, you should always use the variables assigned to elements and never the element ID’s as most ID’s on HireHop are dynamically created and will be different with every instance.  If the element ID has numbers in it or is not nicely named, definitely don’t use it.

new_function_name: function() { }
Finally, this does nothing and is not necessary for what we need to do, it just demonstrates that you can even add your own functions into the widget.

When you reload the HireHop page, you will see the word Hello after the refresh button if you did everything correctly.

Versioning

A huge advantage of using the HireHop NoHTML framework is that all the JavaScript is cached, resulting in fast page loading as the browser uses the JavaScript files in its cache.  This can be problematic when you update your plugin, as all the users using it, their browsers won’t download the updated version, and instead use their cached version, that is unless they clear their browser cache.

To overcome this, when adding your JavaScript URLs to the Plugins options, you can use a versioning parameter, for example for https://www.mywebsite.com/plugin.js you would enter it as https://www.mywebsite.com/plugin.js?v=1. After an update you can then change it to read https://www.mywebsite.com/plugin.js?v=2 which will force all browsers to reload the JavaScript file from your server.  If you don’t have a server to store the code on, you can always use GIST or Google Open Source.

Posted in API

Custom Fields – HireHop API

You can have an unlimited number of custom fields in HireHop specific to each record, a record being a job, project, test/service, asset, etc.  All custom fields can be used in documents, as long as they exist, otherwise they will just be blank.

Currently custom fields are only fully supported in Jobs and Projects. Custom fields can only be used using plugins.

Custom Fields Structure

When fetching a custom field for the currently edited record, there is a function called _get_custom_field_value(field) which will return NULL if the field is not set, a string, or a JavaScript object, depending on how you saved it.

You probably should save custom fields as a JavaScript object (like JSON) in the following format for more printing control, as if it is just a string, HireHop will treat it as a string:

"field_name" :
{
"value"  : "The value of the field",
"type"   : "The field type, default is text, it can also be number, currency, text, date, html and array"
"format" : "For date type only, eg "ddd, dddddd tt" // = "Mon, January 1 2017 12:00"
}

  • value is the value of the field in any format.
  • type tells HireHop how the field should be treated when merging it into a document. An array field will be displayed as JSON.
  • format tells HireHop how to format the field in the document, currently only available dates and is dependent on the users settings and how their date and time formats are set:
    • dddddd for a long date (like January 1 2018)
    • ddddd for a short date (like 01/01/2018)
    • dddd for the day of the week (like Monday)
    • ddd for the short day of the week (like Mon)
    • tt for the time (like 12:36 am).

The format part is only needed for dates and if it is not set, nothing will show.  You can merge formats together and add separators, for instance you can use dddd, dddddd tt which will give «Monday, January 1 2018 12:00» if the user has set a date order as day month year. The value for a date type must be stored in the yyyy-mm-dd hh:mm format.

If you just save the field as a string and not a JavaScript object, that’s fine, HireHop will just treat it as a string.  Saving your custom fields as a JavaScript object will give you greater control, especially when HireHop prints them in a document.

Saving The Custom Fields

On all edit forms that support custom fields, there is a function called _save_custom_field_value(field, value).  This stores your fields to be saved later.  If you can’t find the function, please contact us.

Please note, that all changes must be written prior to saving.

When the custom fields are saved, they are merged with the existing fields, and any new fields passed with the same name as any existing ones, the new values will be set.

When saving the custom fields, for example using /php_functions.job_save.php directly as an API call, only parameters set will be updated, so if you only set the custom_fields post parameter, only the custom fields will change, all the other fields will stay as is.

Printing Custom Fields

All custom fields can be incorporated into documents just like normal fields and are prefixed with a single «_» (underscore) character.  For example, for a custom field in a job called «field_name», you would load it by using the merge field «job:_field_name«.

Naming Custom Fields

Some custom fields in documents merge fields together, for example tests merge with an asset in some document fields, so be careful not to use the same field name in an asset and a test.  Also, other plugins maybe added in the future written by yourself or from another source, so add a prefix that denominates you, for example plugins written HireHop by use the «hh_» prefix, so a field written in a plugin by us might be called «hh_NewName».  Field names in document merges are not case sensitive, but they obviously are in JavaScript.

Searchable Custom Field

There is an additional field called CUSTOM_INDEX, that can be used for searching, filtering and listed in search results.  The field is a 45 character string value that can be set to NULL. To enable the field to be shown in the search results on the home page, change the allSearchCols global JavaScript variable by adding CUSTOM_INDEX to it:

if(allSearchCols.constructor===Array && doc_type==0 ) {
allSearchCols.push("CUSTOM_INDEX");
}

There is also a language setting for the custom field displayed name:

if(typeof(lang["customIndexTxt"])=="undefined" || lang["customIndexTxt"]=="") {
lang["customIndexTxt"] = "Custom field name";
}

The reason for the testing for undefined or blank above is just in case the user has set it in the language.

You can use the custom searchable field in the page by adding a lookup in the page or the editor.  On jobs there is a hidden tile that displays the  CUSTOM_INDEX field and can be shown and utilised like so in a plugin:

$("#job_tile_custom_index")
.show()
.click(function() {
window.open("https://www.my_external_app.com?id="+job_data["CUSTOM_INDEX"],"newwindow");
});

To save the CUSTOM_INDEX field in the relevant edit widget, using a custom plugin you can add a form element into the edit widget, for example like so:

// This adds the CUSTOM_INDEX field into the job edit widget
if(typeof($.custom.job_edit)!="undefined") {
// Redefine job_edit, move name to after telephone
$.widget("custom.job_edit", $.custom.job_edit, {
_init_main: function() {
// Call the old _init_main
this._super(arguments);
// Add an extra edit in the job edit
var table = this.default_disc.closest("table");
var tr = $("<tr>").appendTo( table);
$("<td>", { html: lang.customIndexTxt+ " :" }).appendTo(tr);
$("<input>", {
"name" : "custom_index", // Parameter to pass when saving
"class" : "data_cell",   // Setting class to data_cell tells HireHop it is a standard data field
"data-field" : "CUSTOM_INDEX", // Name of the field
"maxlength" : 45         // The CUSTOM_INDEX has a maximum length of 45 characters
})
.appendTo( $("<td>").appendTo(tr) );
// Change the memo height to compensate
this.job_edit_memo.height(110);
}
});
}

The CUSTOM_INDEX field is called xxx:custom_index in the document and is passed as a string into the document.

Global Custom Fields

Occasionally you might want to store a global counter, etc. for the whole company.  To read and store global custom fields use /php_functions/custom_fields_global_load.php and /php_functions/custom_fields_global_save.php.  Saving the data, you need to pass either a json string or json array:

$("#saving_dialog").dialog("open");
// This adds the CUSTOM_INDEX field into the job edit widget
$.ajax({
url: "/php_functions/custom_fields_global_save.php",
type: "post",
dataType: "json",
data: {
"fields":{"my_field":"any type of value"}
// or a json string
// "field":'{"my_field":"any type of value"}'
},
success: function(data)
{
$("#saving_dialog").dialog("close");
// HireHop reported an error
if(typeof(data.error) !== "undefined")
error_message(isNaN(parseInt(data.error)) ? data.error : lang.error[data.error]);
else
{
// All good, "data" is a javascript object (JSON) of all global custom fields
}
},
// Handle an http error
error: function(jqXHR, textStatus, errorThrown)
{
$("#saving_dialog").dialog("close");
error_message(lang.error[1]+" ("+errorThrown+").");
}
});

Posted in API

Feed Hire Stock Data to Your Website – Link Data to Your Website

Synchronise with the cloud

HireHop allows you to seamlessly feed stock data to your website; enabling you to list hire and rental stock on your website, with images and other data, that is synchronised with the HireHop equipment rental software’s database.

You can filter the lists (or not) by category or name, as well as sort them by name, price, weight or stock quantity held. You can also choose what format you want the export in, albeit JSON, CSV or XML

This feature can also be used to export your hire stock data easily, enabling you to export filtered parts of your data or all of it at once, the choice is yours.

How to Get a List

Before you export a list, you must first create an export key. This key is like a password that must be passed to get the list.  If you change the export key, any requests made not using the new export key, will be denied.

To get the export, you need a link, this you can get from the Hire Stock Management page.  By clicking on Menu and then Get data link, a box will appear with a link to get a list for the current filtered view.  To get the export link, you must be authorised to get it in the user permissions.

If you apply any filtering in the Hire Stock Management page, this filter will be the data the generated link will produce.  So for example, if you select a category and then get a data link, the data produced by the link will be all the stock in that category, just as it is listed on the page.

The data returned by HireHop includes the name, an image link, quantity, category, weight, dimensions, prices, part number, etc.

Technical

https://s.myhirehop.com/modules/stock/stock_export.php?id=10&key=abc1234def&depot=1&cat=0&sidx=TITLE&sord=asc&format=xml

The generated link will look something like above, and as you can see, it has various parameters that are explained below:

Parameter Meaning
id This is a unique ID for your company.
key The generated export key.
depot An identifier for a depot (zero means all depots), to get the quantity.
cat The identifier for a category
cat_name The name of a category
name The name search
del If set to one, deleted items will be listed
unq A unique ID of an item. If set, only one item will be returned.
sidx The column to sort by
sord The sort order; asc = ascending & desc = descending
format The format the data will be returned in, being XML, CSV or JSON (default)

To load the data into your web page, you can Ajax it using JSONP, for example, with JQuery:

$.ajax({
    url: "https://s.myhirehop.com/modules/stock/stock_export.php?id=10&key=abc1234def",
    dataType: "jsonp",
    success: function( data ) {
        console.log( data );
    }
});

Please note, the service, pat test and test intervals are in ISO 8601 period formats and all dimensions and weights are metric.